A swarm trap is a 40-liter wooden box, baited with old comb and a few drops of lemongrass oil, hung 10 to 15 feet up a tree to mimic the natural cavity scout bees look for when their colony swarms. Build one for under $25 in materials, deploy it before the first warm week of spring, and you have a realistic shot at catching a free colony of bees that would otherwise fly off and disappear into the woods.
Catching swarms is the cheapest path to expanding an apiary. A package of bees runs $180 to $260 in 2026, and a 5-frame nuc runs $200 to $325 (Bee Culture Magazine 2025 Package & Nuc Pricing Survey, 2025). A single successful trap pays for itself many times over — and the bees you catch are often locally adapted survivor stock, not commercially shipped colonies that may struggle in your climate.
This guide walks you through the science behind swarm trap dimensions, the bait recipe scout bees can't ignore, exact placement rules, the spring timing window, and how to transfer caught bees into a Langstroth hive without losing the queen. Everything here is based on the cavity-preference research Dr. Thomas Seeley conducted at Cornell, refined with the field-tested adjustments serious swarm catchers use today.
TL;DR: Build a 40-liter box with a 2 square inch entrance near the bottom, hang it 10 to 15 feet high facing south or southeast, bait it with one drop of lemongrass essential oil and a frame of old brood comb, and deploy it 2 to 4 weeks before your local nectar flow peaks. Check it weekly. Move caught swarms into a permanent hive within 2 weeks before they fill the trap with comb.
Why Swarm Traps Work: The Cavity Preferences of Honey Bees
Scout bees do not pick random cavities. They evaluate potential homes against a set of preferences hardwired by 40 million years of evolution, and a well-built swarm trap hits every one of them.
Dr. Thomas Seeley spent decades documenting these preferences at Cornell University, eventually publishing them in Honeybee Democracy. His research found that scout bees consistently choose cavities that match a narrow set of physical specifications, and that traps built outside those specifications get ignored even when bees are actively swarming nearby.
The five cavity preferences scouts evaluate:
- Volume. 40 liters (about 10 gallons) is the sweet spot. Smaller cavities fill with comb too fast and trigger another swarm; larger cavities are harder to defend.
- Entrance size. 10 to 15 square centimeters (roughly 2 square inches). Larger entrances are vulnerable to robbing and predators.
- Entrance height above the cavity floor. Bees prefer entrances near the bottom — they want to build comb downward from the top of the cavity.
- Height above ground. 4 to 5 meters (13 to 16 feet) is the strong preference, though traps as low as 8 feet still work.
- Cavity history. Cavities that previously housed a colony — with the residual wax, propolis, and pheromones — get chosen far more often than fresh ones.
A trap built to these specs and baited correctly catches swarms because it looks, smells, and feels like an ideal nesting cavity to the scouts who tour it.
Swarm Trap Dimensions: The 40-Liter Standard
The single most important spec is interior volume. Forty liters works because it matches the average cavity size of a wild colony's first home — large enough to start building comb and rearing brood, small enough to defend with a swarm-sized population (10,000 to 20,000 bees).
A 40-liter box that fits 8 medium Langstroth frames is the most popular hobbyist build because it doubles as a working hive after catching a swarm. You can also build a "deep nuc" style trap that holds 5 deep frames — slightly under 40 liters but close enough for high catch rates and easier to handle on a ladder.
Recommended Trap Dimensions
| Trap Style | Interior Dimensions | Volume | Frames | Best For |
|---|---|---|---|---|
| 8-Frame Medium | 19" L × 14" W × 7" H | 40.4 L | 8 medium | Easiest transfer to standard equipment |
| 5-Frame Deep Nuc | 19" L × 9.5" W × 9.5" H | 38.8 L | 5 deep | Lighter to lift; easy ladder placement |
| Cylindrical (10 gal pot) | 14" diameter × 18" tall | 40.0 L | None initially | Lightweight, weather-resistant |
| Plywood Cube | 14" × 14" × 14" | 45.0 L | None initially | Ultra-cheap; transfer comb later |
The exact internal volume matters less than getting close to 40 liters. Studies in Seeley's Honeybee Democracy showed catch rates dropping sharply on cavities below 20 liters or above 100 liters, but variations between 30 and 50 liters made little difference.
Entrance Specifications
The entrance opening should be 10 to 15 square centimeters total — roughly a 2-inch by 1-inch slot, or a 1.5-inch diameter round hole. Drill or saw the entrance near the bottom of the front face, leaving most of the cavity above it. Scouts inspect both the entrance size and where it sits relative to the cavity floor; entrances at the top get rejected because they leave no room to build comb downward.
Pro Tip: Add a small landing board or shallow lip below the entrance. It is not strictly necessary, but it helps the swarm cluster at the entrance during the first hours after they arrive, and it gives you a visual cue when checking the trap from the ground.
How to Build a Swarm Trap: Tools, Materials, and Step-by-Step
Building an 8-frame medium swarm trap takes about 90 minutes with basic tools. Total cost runs $20 to $35 depending on whether you have scrap plywood on hand.
Materials List
- One 4' × 8' sheet of 1/2" exterior plywood (one sheet builds 2-3 traps)
- 1-1/4" exterior wood screws (about 30 per trap)
- Wood glue (Titebond III or similar exterior-rated)
- Two 1" eye screws or strap loops for hanging
- Small piece of #8 hardware cloth (1" × 4") for entrance reducer (optional)
- Exterior paint or boiled linseed oil (do not use indoor paint)
- 8 medium frames with foundation or one frame of old drawn comb
Tools Needed
- Circular saw or table saw
- Drill with bits (1/8" pilot, 1.5" hole saw or jigsaw for entrance)
- Measuring tape and square
- Sandpaper (120 grit)
- Paint brush
Build Steps
- Cut the panels. From the plywood sheet, cut: two long sides (19" × 7"), two short sides (13" × 7"), one bottom (19" × 14"), and one top (19" × 14"). Sand all edges.
- Pre-drill pilot holes. Drill 1/8" pilots every 4 inches along the joining edges to prevent splitting.
- Assemble the box. Apply wood glue and screw the four sides together, then attach the bottom panel. Leave the top loose — it becomes a removable lid.
- Cut the entrance. On one of the long sides, mark a 2" × 1" slot, 1" up from the bottom. Drill a starter hole and finish with a jigsaw, or use a 1.5" hole saw for a circular entrance.
- Build the lid. Attach two strips of 1" × 1" cleats to the underside of the top panel so it sits snugly on the box without sliding. Do not screw the lid down — you will need to remove it for inspections and transfers.
- Attach hanging hardware. Screw two eye screws into the top panel, one at each end, spaced 12" apart. Run a length of paracord or ratchet strap through them when hanging.
- Paint or oil the exterior. Use earth tones — brown, tan, or olive green. Bright colors can reduce catch rates and attract unwanted attention. Leave the interior raw wood; do not paint inside.
- Cure for 48 hours. Let glue and paint fully cure before adding bait. Fresh paint smell repels scouts.
- Add frames and bait. Slide in 7 frames of foundation plus 1 frame of old drawn comb. Add lemongrass oil bait (next section). The trap is ready to deploy.
Pro Tip: If you have an old, retired Langstroth deep box collecting dust in the shed, you already have a 42-liter swarm trap. Add a 2-inch entrance disc, a temporary bottom board, and a lid — done in 20 minutes. Recycled equipment with residual wax and propolis catches swarms faster than new wood.
How to Bait a Swarm Trap: The Lemongrass Oil Lure
The right bait combination triples catch rates compared to an unbaited trap. The two ingredients that matter most are old beeswax comb and lemongrass essential oil. Everything else is optional.
The Two Core Baits
Old drawn comb is the strongest attractant. Used brood comb — even a single frame of it — releases the comb pheromone scouts associate with a successful, established colony. If you have access to even a 4" × 4" piece of old comb, fasten it to the inside of the trap with a thumbtack or rubber band.
Lemongrass essential oil mimics the synthetic attractant Nasonov pheromone, which scout bees release at the entrance of a chosen cavity to guide returning workers. A 2007 study published in the Journal of Apicultural Research found lemongrass oil to be the most effective synthetic Nasonov substitute in field tests, increasing trap catch rates by 30 to 50 percent (Schmidt, J.O., 1994; Schmidt review in Journal of Apicultural Research, 2007).
Bait Application: Exact Recipe
The mistake new swarm catchers make is using too much lemongrass oil. More is not better — overpowering doses repel scouts.
| Bait | Amount | Where to Apply | Refresh Interval |
|---|---|---|---|
| Lemongrass essential oil | 1-2 drops | Cotton ball inside trap, or directly inside entrance | Every 2 weeks |
| Old brood comb | 1 frame or 4-inch piece | Inside trap, against a wall | Once per season |
| Propolis tincture (optional) | 5-10 drops | Smeared inside entrance | Once at deployment |
| Slumgum (rendered wax debris, optional) | 1 tbsp | Bottom of trap | Once at deployment |
Avoid: lemon balm oil (similar smell, weaker effect), citronella, peppermint, or any oil mixture marketed as a "bee attractant" without lemongrass as the primary ingredient. Skip honey or sugar syrup — they attract robbing bees, ants, and wasps without bringing in scouts.
Commercial Swarm Lures
If you do not want to mix your own, several commercial lures work well:
- Swarm Commander — synthetic pheromone spray, the most popular ready-to-use lure
- Mann Lake Swarm Lure — gel format, lasts 90 days
- Better Bee Swarm Lure — slow-release packets
Commercial lures cost $10 to $25 and last several months. They perform comparably to a properly applied lemongrass-and-comb combination, but the homemade version is cheaper and gives you more control over freshness.
Swarm Trap Placement: Height, Direction, and Habitat
Placement matters as much as the trap itself. A perfectly built and baited trap hung in the wrong location catches nothing, while a mediocre trap in the right spot fills with bees in days.
Optimal Height
Scout bees prefer cavities at 4 to 5 meters above the ground — about 13 to 16 feet. This was one of Seeley's strongest findings: traps at 13+ feet caught swarms at roughly twice the rate of traps at 3 feet, even when every other variable was identical.
Practical reality limits most hobbyists to 8 to 12 feet, which still works well. Use an extension ladder, a tree-mounted trap hanger, or a long ratchet strap looped around a sturdy branch. The trap must be secure — a 40-pound trap full of bees and comb that falls from a tree is dangerous and demoralizing.
Direction and Sun Exposure
Face the entrance south or southeast. Morning sun warms the trap and stimulates scouts to begin foraging early in the day, when most swarm decisions get finalized. Avoid west-facing entrances — afternoon sun can overheat the trap interior past 100°F and discourage scouts.
Habitat Selection
Place traps along the edges of woods, near hedgerows, in old orchards, or at the boundary between forest and open field. These transition zones are flight corridors for swarms searching for new homes.
Things that boost catch rates:
- Within a half-mile of known wild colonies or other beekeepers
- Visible from the air — bees use landmarks for navigation
- Near a water source (creek, pond, livestock trough)
- Sheltered from direct wind but with airflow
- Within an hour of your home for easy weekly checks
Things that hurt catch rates:
- Deep inside dense forest (no flight visibility)
- Directly next to your existing apiary (scouts avoid sites near established colonies)
- In full afternoon sun with no shade
- On private property without permission (you risk losing the trap and getting cited)
Pro Tip: If you have permission, hang multiple traps a quarter-mile apart across a 1-square-mile area rather than clustering them. Scouts evaluate cavities competitively, and spreading traps lets you catch from multiple swarming colonies in the same season.
When to Put Out Swarm Traps: Spring Timing
Timing is the difference between catching a swarm and watching one fly past your empty trap. Deploy traps 2 to 4 weeks before swarm season starts in your area.
Regional Swarm Timing
| Region | Swarm Season Peak | Trap Deployment Window |
|---|---|---|
| Deep South (FL, TX, AL) | Mid-February to May | Late January to April |
| California (Norcal, Central) | Late March to June | Early March to May |
| Mid-Atlantic & Pacific NW | Mid-April to mid-June | Late March to May |
| Midwest & Northeast | Early May to early July | Mid-April to June |
| Northern tier (MN, ME, MT) | Late May to mid-July | Early May to June |
In Northern California, the prime window runs from early March through late May, with peak swarming activity tied to the start of the major nectar flow (typically blackberry bloom in early April through late May). Traps deployed in late February consistently outperform traps put up in mid-April because they are already weathered, scent-faded, and "discovered" by scouts before swarm season hits its peak.
Daily and Weekly Patterns
Scouts work hardest on warm, calm days between 10 AM and 4 PM. A swarm typically takes 1 to 5 days to commit to a chosen cavity once scouts begin evaluating it, and they prefer to move on warm days following a stretch of cool or rainy weather. Watch the forecast: a 75°F afternoon following three days of rain is a high-probability swarm day.
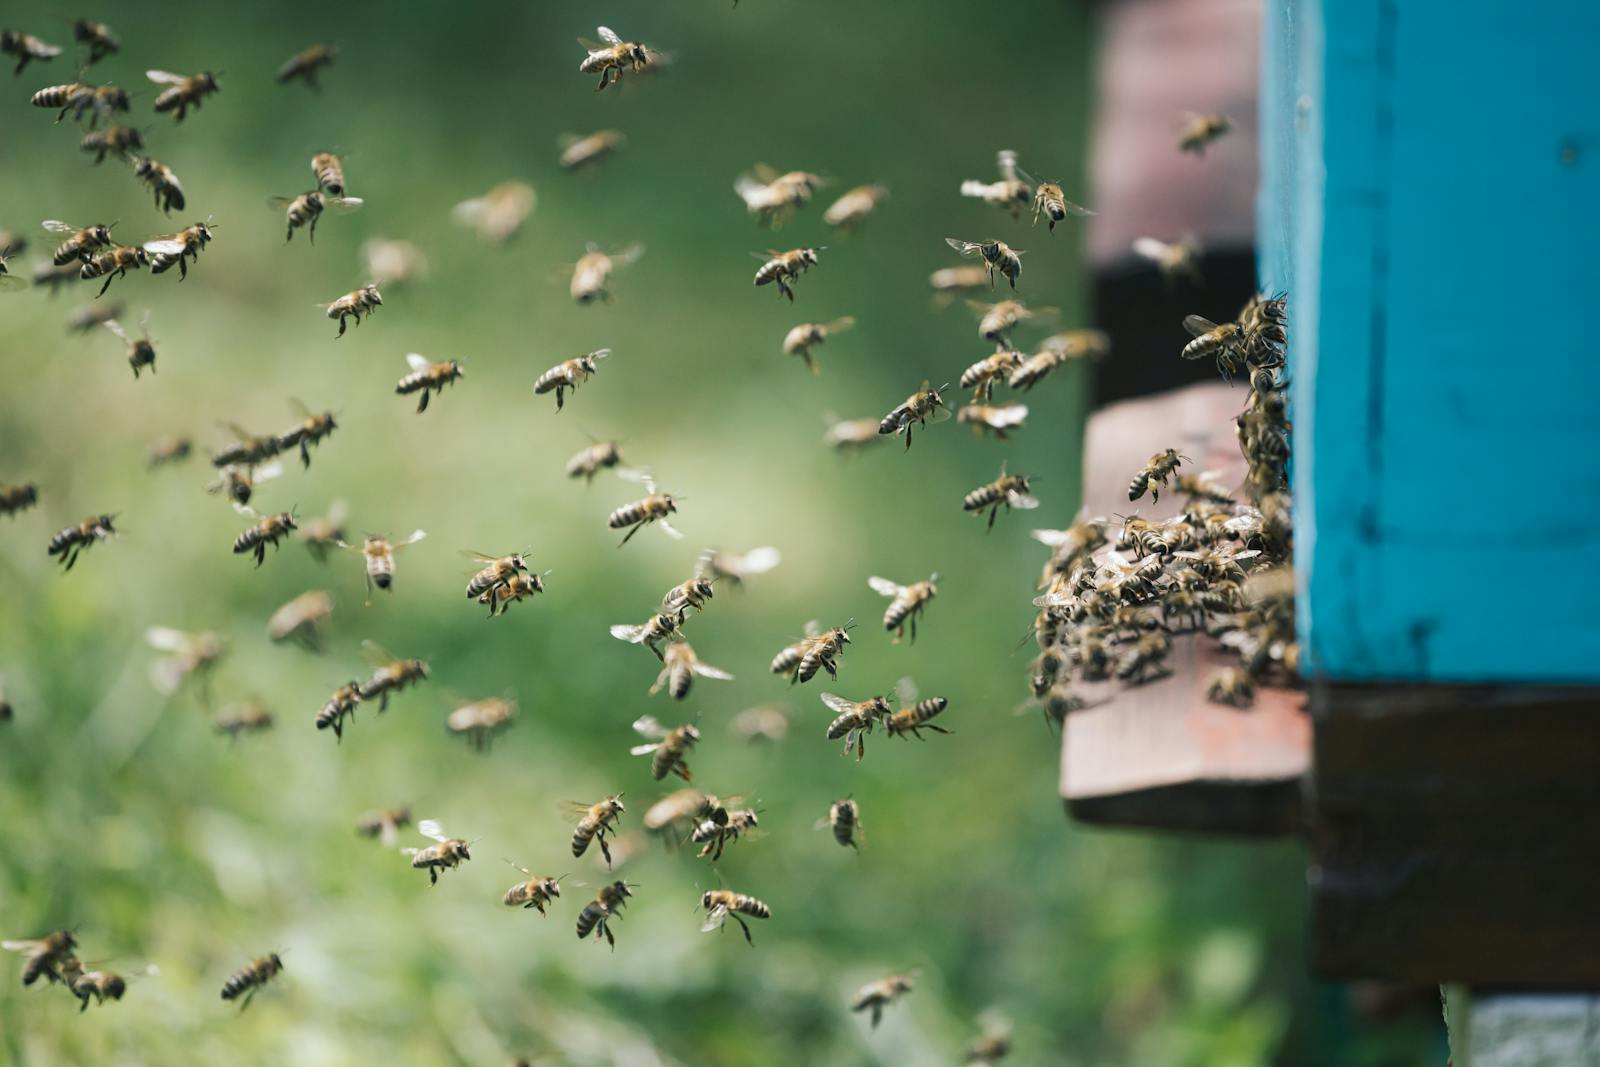
Check traps weekly. Look for increased flight activity at the entrance — even just 5 to 10 bees actively flying in and out is a strong signal that scouts have selected the trap, and a swarm may arrive within 24 to 72 hours.
What to Do When You Catch a Swarm
A successful catch shows up as a steady stream of bees flying in and out, with bees fanning their wings at the entrance to release Nasonov pheromone. From the ground, it looks like the trap is "boiling" with activity.
The First 24 Hours
Leave the trap alone for at least 24 hours after the swarm arrives. The bees need time to settle, locate the queen inside, and begin orientation flights. Disturbing them too early can cause the swarm to abscond — pack up and leave looking for a different cavity.
Moving the Trap Home
Once the swarm has settled (typically 2 to 5 days after arrival), it is time to move the trap to your apiary.
- Wait until evening. Move the trap after sunset when all foragers are home. Bees flying in the dark cannot navigate back to the trap.
- Block the entrance. Stuff the entrance with a wad of grass or insert a foam plug. The grass option is self-clearing — the bees will chew through it within a few hours after you arrive home, giving them time to reorient.
- Lower the trap carefully. Use a rope and slow controlled descent. Tip the trap as little as possible — fresh comb breaks easily.
- Strap or tape the lid. Run a ratchet strap or several wraps of duct tape around the entire trap so the lid cannot pop off in transit.
- Drive home with airflow. Open windows. The 10,000-plus bees inside generate heat fast, and a sealed trap in a hot car can kill the colony in under an hour.
- Place in your apiary. Set the trap in its permanent spot before opening the entrance. The bees will reorient on their first foraging flights the next morning.
Transferring to a Permanent Hive
Move the bees from the swarm trap into a Langstroth hive within 1 to 2 weeks. After that, they will start building comb attached to the lid and walls of the trap, making transfer messy.
The transfer:
- Set the new Langstroth hive in the same spot where the trap currently sits, on the same orientation.
- Open the trap and lift each frame out one by one.
- Transfer frames containing comb, brood, or bees directly into the new hive in the same order.
- For trap styles without frames (cylindrical pots, simple cubes), gently shake or brush the bees into the new hive, then look for the queen on the trap walls and place her inside last.
- Set the empty trap on top of the new hive entrance, lid open, so any remaining bees can crawl into the new hive overnight.
Within 3 to 7 days, the colony will be fully established in the new equipment. From here, treat them like any new colony — feed 1:1 sugar syrup until they have drawn 70% of their frames, monitor for varroa, and conduct your first full inspection at the 30-day mark.
If you are setting up a brand-new trapped colony, our hive inspection checklist for beginner beekeepers walks through exactly what to look for in those first inspections.
Swarm Trap Maintenance and Troubleshooting
A trap left out all season needs minimal attention, but a few small habits dramatically improve catch rates year over year.
In-Season Maintenance
- Refresh lemongrass oil every 2 weeks. One drop on a fresh cotton ball, replacing the old one.
- Check after storms. Wind can knock traps loose or tip them sideways. A tilted trap drains poorly and gets rejected by scouts.
- Watch for unwanted tenants. Wasps, ants, mice, and squirrels sometimes occupy traps. Clear them out and re-bait.
- Note catch dates and locations. Build a season log — successful sites tend to repeat year after year, while dud sites stay duds.
End-of-Season Care
After your local swarm season ends (mid-July in most of the US):
- Take down all traps and store them indoors or under cover.
- Remove and store any old comb separately to prevent wax moth damage.
- Inspect for cracks, splits, or rot. Repair before next season.
- Do not wash or scrub the interior — the residual wax, propolis, and pheromones from any tenants (even briefly inspecting scouts) make next year's trap more attractive.
Common Reasons Traps Fail
| Problem | Cause | Fix |
|---|---|---|
| No scout activity at all | Trap too low, wrong direction, or new wood smell | Move higher, face SE, age the wood |
| Scouts visit but no swarm arrives | Cavity too small or too large | Adjust to 35-45 L volume |
| Swarm arrived then left (absconded) | Disturbed too early, or poor cavity conditions | Wait 24 hours before checking; ensure good shade and airflow |
| Wasps or robbers take over | Entrance too large | Reduce entrance to under 2 sq in |
| Trap fills with comb but no queen | Trapped a queenless secondary swarm | Combine with an existing weak colony or add a mated queen |
Cost Comparison: Swarm Trap vs Buying Bees
The economics of swarm trapping shift dramatically based on catch rate. Even a 30% success rate per trap pays for itself in one season.
| Method | Cost per Colony | Time Investment | Genetic Source |
|---|---|---|---|
| Build & deploy 3 swarm traps | $60-90 + $5 bait + 6 hours | $20-30/colony at 50% catch rate | Local survivor stock |
| Buy a 3 lb package | $180-260 + shipping | 1-hour install | Commercial breeder |
| Buy a 5-frame nuc | $200-325 + pickup | 30-min install | Regional supplier |
| Hive split (existing colony) | Equipment only ($75-100) | 1-2 hours per split | Your own genetics |
| Capture a known swarm by hand | Free (drive time only) | Variable, 1-3 hours | Local |
A typical hobbyist who deploys 3 traps in good locations catches 1 to 2 swarms per season, putting effective cost per colony at $30 to $90. The same season buying packages would run $400 to $750 for the same number of colonies. After year two — when traps have residual scent and known good locations — catch rates often climb above 70 percent.
Beyond cost, trapped swarms come with adaptive advantages. Bees that survived a winter and made the decision to swarm are by definition healthy enough to reproduce. Locally adapted feral genetics often outperform commercial stock in regional climate stress, as our deep dive on locally adapted queens vs commercial survivor stock explains.
Frequently Asked Questions
What is the best bait for a swarm trap?
The best bait is a combination of one drop of pure lemongrass essential oil applied to a cotton ball or directly inside the entrance, plus a single frame of old drawn brood comb placed inside the trap. The lemongrass oil mimics Nasonov pheromone, which scout bees use to mark and attract their swarm to a chosen cavity. Old comb releases brood pheromone and signals "established colony" to inspecting scouts. Refresh the lemongrass every 2 weeks. Avoid honey, sugar syrup, citronella, or generic essential oil blends — they attract pests, not scouts. Commercial lures like Swarm Commander work comparably well if you prefer a ready-made option.
How high should a swarm trap be?
Hang a swarm trap 13 to 16 feet above the ground for the highest catch rate. Cornell University research by Dr. Thomas Seeley found that scout bees show a strong preference for cavities at 4 to 5 meters elevation. Practical hobbyist setups at 8 to 12 feet still work, but catch rates drop noticeably below 8 feet. Higher is generally better, with the limit being how safely you can hang and retrieve the trap. Use a sturdy ratchet strap, eye screws, or a tree-mounted hanger. The trap must be perfectly secure — a falling 40-pound trap full of bees and comb is dangerous.
When should I put out swarm traps?
Deploy swarm traps 2 to 4 weeks before swarm season starts in your area. In Northern California, that means early March through mid-April. In the Deep South, late January through February. In the Midwest and Northeast, mid-April through May. The goal is for the trap to be in place, weathered, and "discovered" by scout bees before swarms actually issue. Traps put up after peak swarming has begun will catch some late swarms but miss the prime window. Leave traps up through the end of swarm season — typically mid-July across most of the US.
Do I need a Langstroth frame inside a swarm trap?
You do not need a frame for the swarm to move in, but using frames makes transferring the colony to a permanent hive much easier. Frameless traps (cylindrical pots, simple plywood boxes) work fine for catching swarms but require shaking or brushing bees into your hive and dealing with comb attached to the trap walls. If your trap is sized for 8 medium or 5 deep frames, fill it with foundation frames plus one frame of old drawn comb. Scout bees do not evaluate frames — they evaluate volume, entrance, and cavity history.
Can I put a swarm trap in my yard?
Yes, but expect lower catch rates than in remote locations. Backyard traps in suburban areas can still catch swarms, especially in regions with established beekeeping communities and feral colonies. The best backyard placements are: 13+ feet up a sturdy tree, facing south or southeast, away from your existing apiary (at least 50 feet), and along a fence line or wood edge. If your yard backs up to woods, parks, or open space, your odds improve significantly. Urban beekeepers in cities like Sacramento, San Francisco, and Portland report consistent backyard catches each spring.
How many swarm traps should I put out?
For hobbyists, 3 to 5 traps in different locations across a 1-square-mile area is the sweet spot. More traps means more catches, but each trap requires weekly checks and seasonal maintenance. Commercial swarm catchers may deploy 30 to 100 traps across a county, but they treat it as part of their business. For someone trying to add 1 to 2 colonies per year, 3 well-placed and well-baited traps consistently outperform 10 mediocre ones.
Will a swarm move into a trap with no comb?
Yes, but the catch rate is significantly lower. Old comb is the strongest single attractant — it raises the chance of a scout choosing your trap over a competing cavity by an estimated 30 to 50 percent. If you do not have any old comb, a heavy application of beeswax rubbed inside the trap, plus lemongrass oil and propolis tincture, can partially substitute. Beekeepers in their first season without access to old comb sometimes ask their local club for a small piece — most experienced beekeepers will gladly share a 4-inch chunk of old brood comb to help a beginner get started.
Is it legal to keep bees I catch in a swarm trap?
In most U.S. states, yes — feral honey bee swarms have no owner once they have left an existing apiary. However, registration requirements still apply in many states, including California, where any beekeeper with one or more managed colonies must register annually with their county agricultural commissioner. Our guide to California beekeeping laws and registration covers the specifics. If a swarm comes from a known beekeeper's apiary nearby, the courteous (and in some states, legally required) approach is to contact them and offer to return it.
Final Thoughts: Why Every Beekeeper Should Deploy Traps
A swarm trap costs $25 in materials, takes 90 minutes to build, and offers the best return on investment in beekeeping. Three traps in good locations can replace $400 to $750 worth of purchased bees each spring while bringing in genetics that have already proven they can survive in your local climate.
The only real cost is patience. First-season swarm catchers sometimes get nothing — placement is wrong, traps go out too late, or the local swarm population is light that year. Year two is almost always better. By year three, most catchers have figured out their best sites, built a small inventory of weathered traps with residual scent, and routinely catch 2 to 5 swarms per season.
Start now. Build a trap this weekend, identify three locations within 20 minutes of your home, and get them up before the first warm week of spring. The bees you catch may end up being the most productive, healthiest colonies in your apiary — and the satisfaction of pulling free, locally adapted bees out of a tree is one of beekeeping's quietest pleasures.
For new beekeepers preparing to receive their first swarm, our beekeeping equipment and supplies checklist covers everything else you will need to set up a permanent hive. Pair that with the honey bee swarm season guide to understand the biology behind what you are catching, and the hive inspection checklist for beginners for managing your new colony through its first season.
Start Your Beekeeping Journey
Our beginner beekeeping course walks you through everything — from your first hive inspection to your first harvest.
Related Articles
Honey Bee Swarm Season Guide
Continue reading to learn more about this topic.
How To Split A Beehive Beginners Guide
Continue reading to learn more about this topic.
How To Start Beekeeping Beginners Guide
Continue reading to learn more about this topic.
Beekeeping Equipment Supplies Checklist
Continue reading to learn more about this topic.